Hazel is one of these automation tools for the Mac that is almost invisible but over time becomes vital in so many ways that your Mac almost feels broken when they are not installed. I've used Macs for years now but started off very slowly. I only used apps that came preinstalled with the system and only installed those core apps that I really needed to get the job done. Only over time and in stark contrast to other devices like the iPad, I began to realize that the Mac is so much more powerful and can do so much more.
On that pathway, I stumbled upon automation apps like Alfred, Keyboard Maestro, or simple apps like Bartender that I began to use and love. Relatively late, I also got a license of Hazel, which I immediately tweaked to become my secret power horse. These days, so many laborious tasks on my Mac are handled by such automation tools. Over time I will show you some of my most used workflows here.
I want to start this series with my image resizing workflow for Hazel. As I regularly post images online on my blog, I need these images to have certain dimensions, the metadata and locations need to be stripped away and my personal metatags for copyright and contact information need to be set. All that can be done with Hazel with not much more than a simple drag and drop.
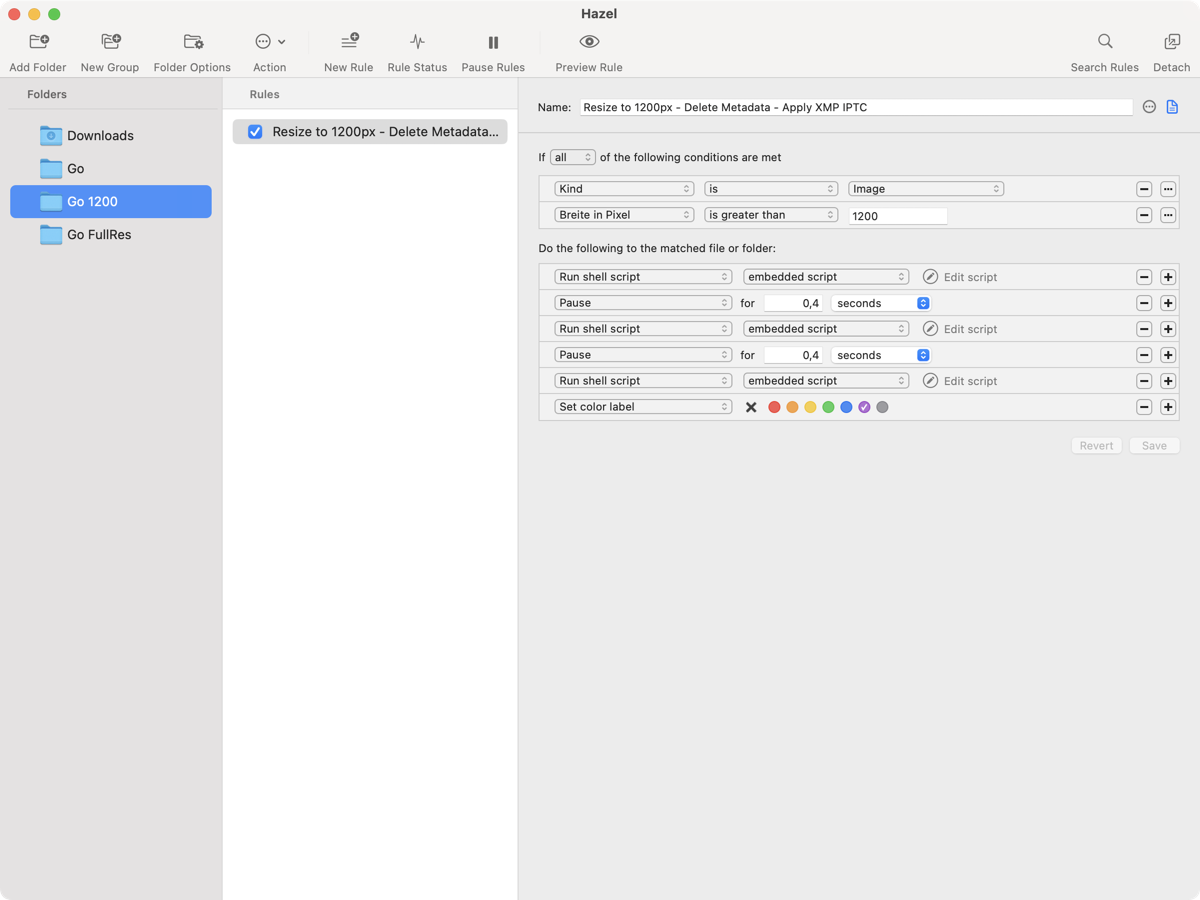
So let's start. What you see in this screenshot are the different elements this workflow is built of. Start by opening Hazel. You can see that the screen is divided up into three rows. At the very left are the listening folders for Hazel. These folders are watched by Hazel in the background to perform certain actions. In the middle are the rules specific for that one selected folder. Finally on the right are the different elements that create the rule.
We start by adding a new folder. So click on "Add Folder" on the top and choose an existing folder or create a new one. In my case, I created a new one and called that specific folder "Go 1200". All contents in that folder will be altered by our new Hazel rule, so be careful which folder to choose. After that, click on "New Rule" to create a new rule. Give it a name, in my case, it's called "Resize to 1200px". Now comes the fun part. We're building up our first rule.
First, we create some conditions if and when the rule applies. So the rule checks here for only images contents and picks only those images whose width is more than 1200px. Make sure that "all" is selected at the very top so that all the conditions need to be met in order for the rule to fire. Change all the other settings according to the screenshot provided.
Now let's move to the lower part of the rule pane. Here, certain shell scripts come to work. Don't worry, the scripts are easy to understand, but make sure to dive deeper into the subject at some later point as all these options are really powerful. So pick "Run shell script" and "embedded script" and then click on the round handle which says "Edit script". The first script uses the command SIPS that is built into macOS and comes in really handy when you often have to deal with images. So make yourself familiar with SIPS, it's really worth it, especially in combination with Hazel. Here's the code to enter into the first field:
sips -Z 1200 "$1"Easy, right? Basically, all it does is to take the current image Hazel is just about to work with (variable $1) and resize it down proportionally to 1200px. That's all. Isn't that cute?
Now let's move on to the next column. It inserts a little pause of a few milliseconds, which is mainly there for security reasons if you're on a slower machine.
Now up to the next shell script. It calls up the mighty EXIFTOOL by Phil Harvey. You need to install this tool before you can actually use it. For that head over to the homepage, from there download and install EXIFTOOL via the package provided. After the install is complete, insert the following script under "Edit script":
exiftool -all= -overwrite_original $1Again, the variable $1 is used for the current image. What this line does is to delete all metadata from the current image. So make sure you have backups of the images that you drag and drop or copy into the Hazel folder.
Another pause to let the machine do its magic.
And now going on to the last major part. Again, we're using the EXIFTOOL to set some IPTC tags for name, mail, website and copyright. You can tweak these values according to your needs. Again, make sure to study some of the other tags supported by the EXIFTOOL, there are literally hundreds for all your needs. Here's the code that worked for me:
exiftool -xmp-dc:creator="your name" -xmp-iptccore:CreatorWorkEmail="mail@example.com" -xmp-iptccore:CreatorWorkUrl="https://example.com" -xmp-dc:rights="© your name" -xmp-plus:copyrightstatus="all rights reserved" -overwrite_original $1Followed by another pause and one last operation, our first Hazel rule is almost finished. The last operation is something that I began using for all my Hazel rules. It marks the specific file that has been processed by Hazel with a color tag. You can find these tags later in your Finder window.
And that's it. Your first and hopefully very useful Hazel rule is ready for action. So its's time to test it. Take one of your image files (or rather a copy of it) and move it to the watch folder you just have created in the first step. Now wait a few seconds, and after that, you should end up with a version of your image file that is 1200px in width, has lost all its metadata got some fresh IPTC tags and finally got a purple color tag. Isn't that cool?
If you liked these implementations, make sure to come back. You can also subscribe to my RSS feed or follow me on social media. I'd be happy to hear from you.